
Lancia Kappa gear lever repair
In various versions of the Lancia Kappa, the gear lever is covered with leather. Over the years, the embossed impression of the shift pattern fades, or the seams of the leather come loose and the leather part separates from the gear lever.
One of our partners has developed a very good solution to solve this problem.
Incidentally, not only for the Lancia Kappa, but also for various other FCA cars that suffer from the same problem. For example, on our site you will find a replacement gear knob with leather or Alcantara upholstery for:
- Fiat Coupé
- Alfa Romeo 166
- Alfa Romeo GTV (chassiscode 916)
- Alfa Romeo Spider (chassiscode 916)
An assembly manual for these products can be found below:
Installation method (down gear models)
- Disengage the shift skirt patent and pull it completely off the gear lever.
- Pull out the previous toggle button. It is very important that you do not turn the gear knob during removal or installation, as this can/will damage it!
- The end of the rod has a protruding edge, which determines the position of the gear knob and adjusts the internal design of the gear knob
on this. Usually the gear knob is not glued to the rod, so it is enough to pull the previous one upwards with sufficient force.
If you are having trouble removing the previous button, you may be able to make a fork from below (using pliers, for example) and hit this fork (pliers) up to pop the shift button out of place. - Make sure the gear knob is in the correct direction. Similarly, push the new gear knob onto the rod in the correct direction. You will feel it in place when it clicks into place. Avoid using tools or a hammer during assembly as this may damage the button.
- When the new switch button is in place, pull back the top of the switch and re-attach the patent into the designated recess on the bottom of the button.
Method of installation – Pull-up inverted models
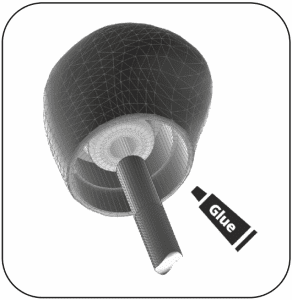
- Pull off the previous shift knob and remove any adhesive residue from the shift stick. The end of the rod has a vertically ribbed surface. The rod diameter is 10 mm. If you are having trouble removing the previous button, you may be able to make a fork from below (using pliers, for example) and hit this fork (pliers) up to pop the shift button out of place.
Note: There is a small coil spring under the gear lever that ensures that the pull-up system works correctly. Make sure you put it back in place before fitting the new gear knob! - The connection surface of the new button is also ribbed on the inside and made of flexible material. Lightly coat both surfaces with a flexible adhesive (e.g. Palmatex, UHU plastic adhesive, etc.)
- Place the shift knob on the stick and make sure that the shift knob is in the correct direction. It is very important that you do not turn the gear knob during removal or installation, as this can/will damage it! Push the gear shift knob down with great force and push it down as far as it will go until it stops. Also avoid using tools or a hammer during assembly as this may damage the button.